This post may contain affiliate links. If you click and purchase, I may receive a small commission at no extra cost to you. Learn more
Imagine the scent of freshly crushed malt drifting through your kitchen, a gentle steam rising from the kettle, and that satisfying first sip of beer you crafted entirely with your own hands. Brewing your own beer at home isn’t just a hobby — it’s a ritual, a blend of science and creativity that rewards patience and curiosity in equal measure.
And the good news? You don’t need a full brewery or expensive gear to get started.
The BIAB method — Brew In A Bag — has revolutionized homebrewing by making it simpler, more affordable, and more accessible than ever before. With just a single kettle, a mesh bag, and some basic tools, you can brew high-quality all-grain beer right in your kitchen or garage. No complicated systems, no unnecessary equipment — just pure brewing joy.
In this BIAB Homebrewing Guide, we’ll walk you step-by-step through everything you need to know to brew your first batch successfully in 2025 — from choosing your setup and understanding ingredients, to mashing, fermenting, and finally pouring your own handcrafted pint. Whether you’re a complete beginner or switching from extract brewing, this guide will give you the confidence and clarity to master the process.
What you’ll learn here isn’t theory — it’s real, tested homebrewing practice shared by brewers who started with the same questions you have now. You’ll also find links to trusted resources like the American Homebrewers Association and Brew In A Bag HQ to explore more once you’re ready to dive deeper.
So grab your brewing spoon, clear some space on your counter, and let’s turn simple ingredients — grain, hops, yeast, and water — into something extraordinary: your first delicious homebrewed beer.
What Is BIAB (Brew In A Bag)?
At its core, BIAB — Brew In A Bag — is the simplest and most approachable way to make all-grain beer at home. Instead of juggling multiple pots, pumps, and mash tuns, BIAB lets you perform every key step — mashing, boiling, and cooling — inside a single kettle. All you need is a sturdy mesh bag, a good thermometer, and a bit of patience.
Think of it as brewing coffee or tea. You steep your crushed grains (the malt) in hot water, just like tea leaves, allowing enzymes to convert starches into sugars. After that, you lift the “tea bag” — in this case, the grain bag — and you’re left with sweet liquid wort ready to be boiled with hops. Once cooled and fermented, that wort becomes beer.
A Brief History
The BIAB method first gained traction in Australia in the mid-2000s, when homebrewers wanted a simpler, more space-efficient way to make all-grain beer. Instead of investing in complex three-vessel systems, they discovered they could use one large kettle and a heat-resistant bag to achieve the same results — with less equipment, less cleaning, and lower cost.
Since then, BIAB has spread worldwide, helping thousands of hobby brewers take the leap from extract kits to true grain brewing.
The Core Idea
Traditional all-grain brewing involves three separate vessels:
- Mash tun (to soak and convert grains),
- Lauter tun (to separate liquid from grain), and
- Boil kettle (to add hops and sterilize the wort).
BIAB simplifies this into one kettle and a bag that acts as both mash tun and filter. The process looks like this:
- Heat water to your target temperature.
- Add your crushed malt inside a fine mesh bag.
- Hold the temperature steady to extract sugars (the mash).
- Lift and drain the bag when done — leaving clear wort behind.
- Boil, cool, and ferment as you would in any other method.
Why It Works
The BIAB method succeeds because it removes complexity without compromising quality.
- Efficiency: You still achieve near-complete starch conversion.
- Control: You choose your grains, hops, and yeast — just like pro brewers.
- Space saving: No bulky mash tun or cooler box required.
- Beginner friendly: Fewer parts mean fewer mistakes.
And the result? A clean, flavorful all-grain beer made with minimal gear — one that rivals what you’d get from much more expensive setups.
The BIAB Difference
What makes BIAB stand out from extract brewing is control and freshness.
Extract brewing relies on pre-made malt syrup; BIAB uses whole crushed grain, which means:
- More creative recipe possibilities,
- Fresher malt flavor,
- Lower cost per batch, and
- A deeper understanding of the brewing process.
So, if you’ve ever dreamed of crafting your own pale ale, stout, or IPA from raw ingredients — BIAB is your gateway.
It’s not just a brewing method; it’s the perfect balance between simplicity and authenticity.
Why this BIAB Homebrewing Guide Is Perfect for Beginners
Starting your homebrewing journey can feel intimidating — there’s new terminology, unfamiliar gear, and the constant worry of “what if I mess it up?”
That’s where BIAB (Brew In A Bag) shines. It strips away the complexity of traditional all-grain brewing and turns it into a simple, hands-on process that anyone can master.
BIAB is designed for real people in real kitchens — no fancy setup, no sprawling garage required. All you need is a kettle big enough to hold your water and grains, a fine mesh bag, and a curious mindset. If you can follow a recipe, you can brew beer.
Simplicity Meets Authenticity
Unlike extract brewing — where you use pre-made malt syrup — BIAB gives you full control over the ingredients. You’ll work directly with crushed malt, hops, and yeast, just like a professional brewer, but without the complicated equipment.
This means you’re learning real brewing skills from the start — how temperature affects flavor, how malt and hops interact, and how fermentation transforms sweet wort into crisp beer.
That balance of simplicity and authenticity is what makes BIAB the perfect bridge between “beginner” and “true brewer.”
To have more insights, you can refer to HomeBrewTalk Forum.
Less Equipment, Less Stress
A full all-grain setup usually involves three vessels: mash tun, lauter tun, and kettle — plus pumps, hoses, and thermometers for each. BIAB reduces that to one vessel and one bag.
The benefits are huge:
- Lower cost: You can start brewing for under £100.
- Faster learning curve: Fewer moving parts, fewer steps to forget.
- Easy to clean: One kettle to scrub instead of three.
- Smaller footprint: Perfect for apartments or shared spaces.
Many professional brewers started with BIAB and still use it for test batches because it’s so efficient and consistent. You get great results without getting overwhelmed.
Time-Friendly Brewing
A typical BIAB brew day takes 4–5 hours, start to finish — less than half the time of multi-vessel setups.
There’s no need for long sparge steps or transferring between tanks. You mash, lift the bag, boil, and ferment — done.
This makes it ideal for people with busy schedules or those who simply want a relaxing weekend hobby that fits into real life.
Budget-Friendly Start
Let’s be honest: brewing can become expensive if you dive straight into advanced systems. BIAB keeps the entry point realistic.
Here’s a simple comparison:
| Brewing Method | Equipment Cost | Average Brew Time | Learning Curve |
|---|---|---|---|
| Extract Brewing | £60–£100 | 2–3 hours | Easy |
| BIAB All-Grain | £100–£150 | 4–5 hours | Moderate but rewarding |
| 3-Vessel All-Grain | £300+ | 6–8 hours | Steep |
BIAB gives you the best of both worlds: affordability and real craft brewing experience. It’s the ideal path for beginners who want to make beer they’re truly proud of.
Confidence Through Control
Perhaps the greatest strength of BIAB lies in understanding. Each brew teaches you something new — how water temperature changes efficiency, how yeast behaves differently with time, or how adjusting hops transforms aroma.
You’re not just following instructions — you’re learning the craft. And with every batch, you gain more control over your process and more confidence in your results.
So if you’ve ever thought “I’d love to make my own beer, but I don’t know where to start,” BIAB is the answer.
It’s brewing made personal, accessible, and deeply rewarding — the first true step from beer drinker to beer maker.
Equipment You’ll Need (Simple Setup Checklist)
One of the biggest advantages of the BIAB homebrewing method is that it doesn’t require a mountain of gear to get started. With just a few essential tools, you can brew high-quality, all-grain beer right from your kitchen or garage.
Here’s a straightforward checklist of what you’ll need — everything you can find online or at your local homebrew shop.
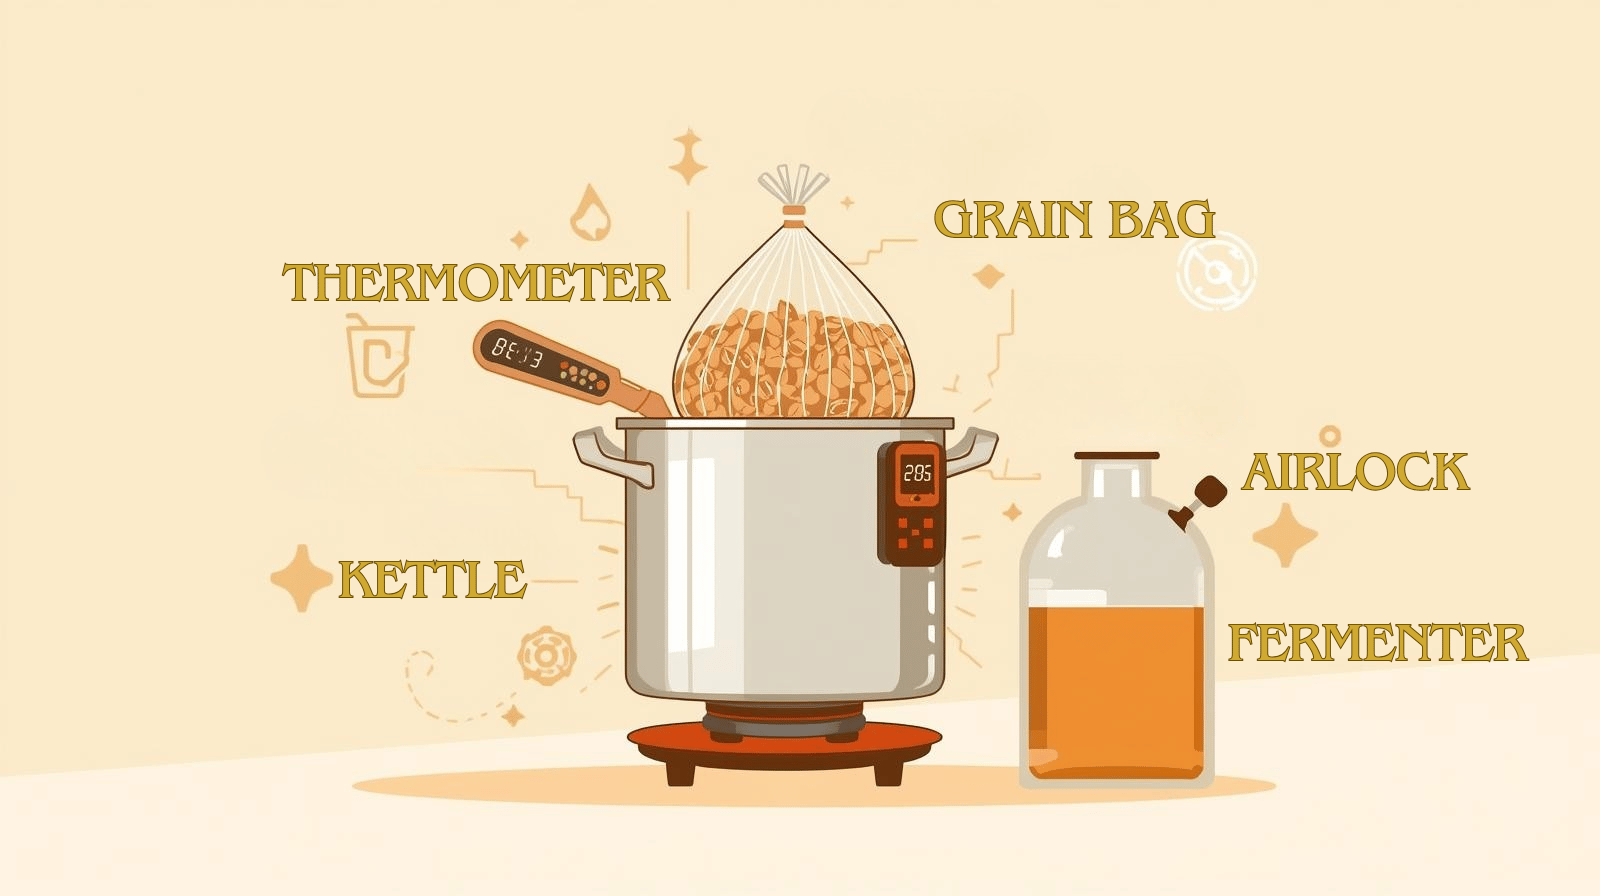
🫕 1. Large Stainless-Steel Kettle (20–30 L)
Your kettle is the heart of your BIAB setup.
It’s where the mashing, boiling, and chilling happen — all in one vessel. A 30-liter (8-gallon) kettle is ideal if you plan to brew around 20 liters (5 gallons) of finished beer, since you’ll lose some volume during boiling and fermentation.
Look for:
- Food-grade stainless steel (for easy cleaning and durability)
- Volume markings (for accurate water measurement)
- A sturdy base to distribute heat evenly
🧺 2. Fine Mesh Brewing Bag (Heat-Resistant)
This is what makes BIAB unique.
The bag holds your crushed grains during the mash, acting as both a filter and a liner. After the mash, you simply lift it out to separate the liquid (wort) from the grain.
Choose a heat-safe nylon or polyester mesh bag designed for brewing — these can handle high temperatures and won’t leach unwanted flavors.
Tip: Get a bag with loops or handles — it’s much easier to lift when full of wet grain (it can weigh 5–7 kg).
🌡️ 3. Digital Thermometer
Temperature control is key in brewing.
During mashing, enzymes convert starches into sugars — and even a 2–3°C difference can change the beer’s sweetness or body. A digital thermometer with a long probe ensures precision and consistency.
Target range: 65–68°C (149–154°F).
Tip: Clip it to your kettle for easy monitoring throughout the mash.
🥄 4. Long Stainless-Steel Spoon or Paddle
You’ll need this to stir your grains evenly and prevent clumps during the mash.
Avoid wooden spoons — they absorb moisture and bacteria. Stainless steel or food-safe plastic paddles are ideal and easy to sanitize.
⚖️ 5. Digital Scale
Accurate measurements are the backbone of repeatable brewing.
Use a kitchen scale that measures in grams for malt and hops, and milliliters for water.
This will help you hit your recipe targets consistently — especially when you start experimenting.
🧴 6. Sanitizer (No-Rinse Type)
Sanitation is the invisible ingredient that separates good beer from bad.
After boiling, your wort is a magnet for bacteria and wild yeast — which means every surface that touches it must be spotless.
Use a no-rinse sanitizer like Star San or Chemipro San. Just mix, spray, and let air dry.
🧪 7. Fermenter with Airlock
After the boil, your cooled wort needs a place to ferment safely.
You can use a plastic fermentation bucket (with an airlock) or a glass carboy.
The airlock allows CO₂ to escape while keeping contaminants out.
Capacity: choose one slightly larger than your batch size — e.g., 25 L fermenter for a 20 L brew.
⚗️ 8. Hydrometer or Refractometer
This simple tool measures the sugar content (specific gravity) of your wort — before and after fermentation — allowing you to calculate alcohol content (ABV).
Learning to read gravity readings is a rite of passage for every homebrewer, and it helps you track fermentation progress accurately.
🍾 9. Bottling Gear
Once fermentation is done, you’ll need:
- A bottling bucket with a spigot
- Bottles (reuse sturdy brown glass beer bottles)
- Caps and a capper
- Priming sugar for carbonation
After conditioning for two to three weeks, your beer will be naturally carbonated and ready to share (or not share — we won’t judge).
💡 Pro Tip: Start Small
Most BIAB brewers begin with 10–15 L batches, then scale up once they get the hang of things. Smaller batches heat and cool faster, making them ideal for early experimentation.
🧾 Quick Equipment Summary
| Essential Gear | Purpose | Notes |
|---|---|---|
| 30 L kettle | Mash, boil, chill | One-vessel system |
| Mesh brewing bag | Hold grain | Heat-resistant nylon |
| Digital thermometer | Temp control | Accuracy = better beer |
| Stirring paddle | Even mash | Stainless steel preferred |
| Digital scale | Accurate measurement | Small adjustments matter |
| Sanitizer | Clean everything | No rinse, food-safe |
| Fermenter + airlock | Fermentation | Plastic or glass |
| Hydrometer | Measure ABV | Learn early |
| Bottling setup | Package beer | Bucket, bottles, caps |
The best part? You don’t need to buy everything at once — many homebrew shops sell BIAB starter kits that include the basics. Once you’re hooked, you can always upgrade piece by piece.

With your gear ready, it’s time to learn the craft — the mash, the boil, and the magic that turns grain and water into beer.
Step-by-Step BIAB Brewing Process
Now that you’ve got your gear assembled, it’s time to brew.
The BIAB method simplifies traditional all-grain brewing into a single, smooth workflow.
Everything happens in one kettle, using one bag, and one good plan.
Here’s your complete brewing roadmap — from heating the water to capping your first bottles.
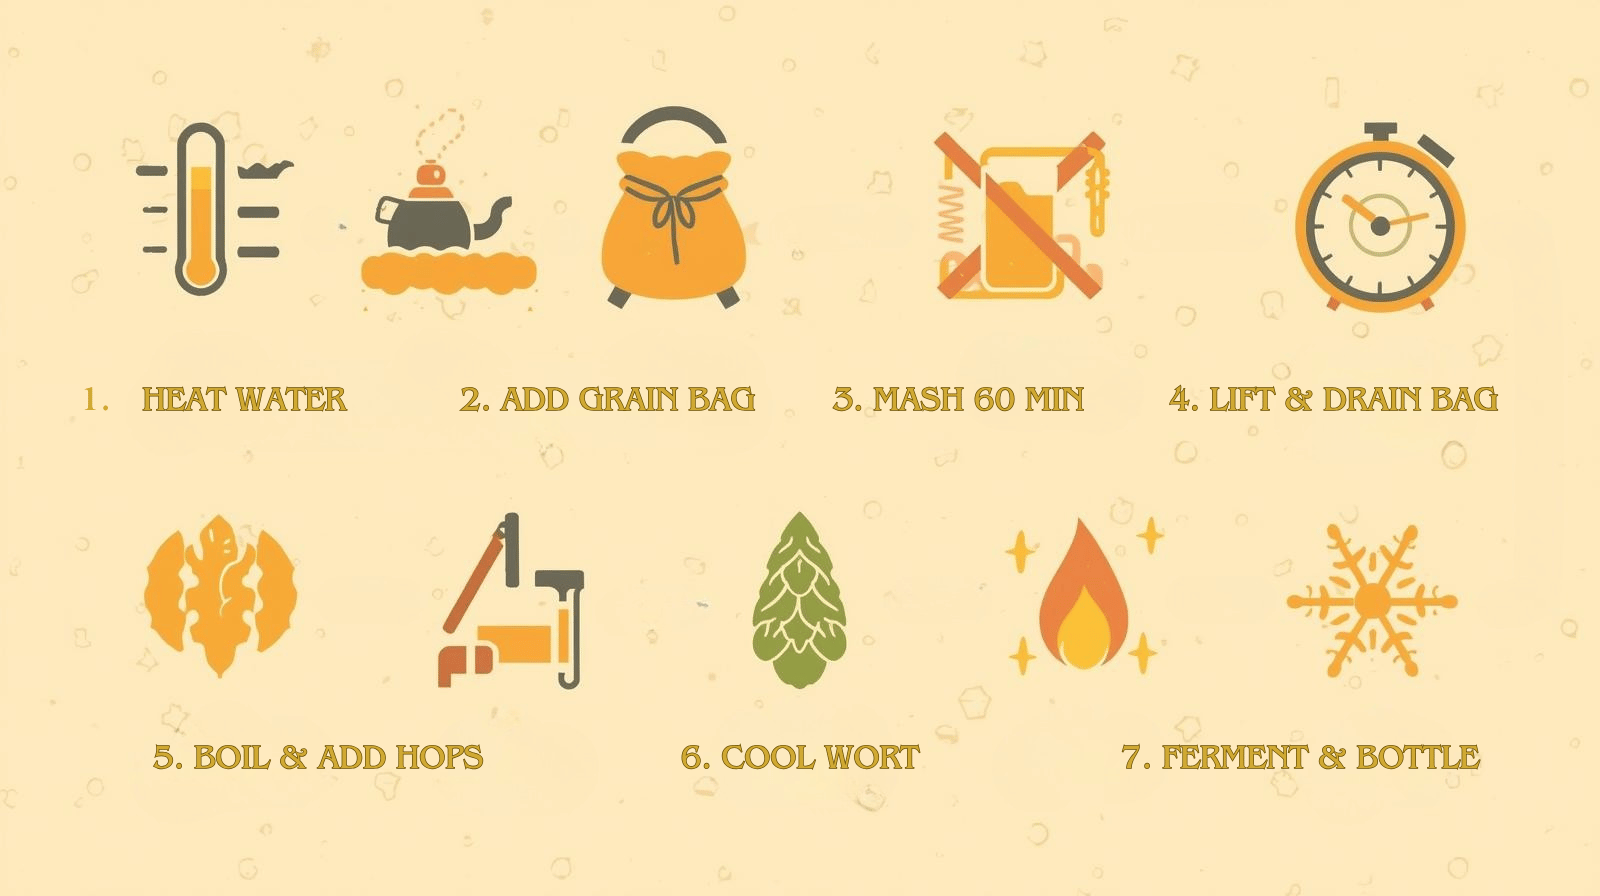
Step 1: Heat the Water (Strike Temperature)
Start by filling your kettle with enough water for the entire batch — about 2.7 to 3 litres per kilogram of grain, plus an extra 3–4 litres to account for evaporation and grain absorption.
For a typical 20 L finished beer, you’ll begin with roughly 28–30 L of water.
- Heat your water to around 72 °C (162 °F).
When you add the grain, the temperature will drop to the desired mash range (65–68 °C). - Stir occasionally while heating to prevent hot spots at the bottom of the kettle.
- Check temperature accuracy with your digital thermometer.
Think of this as preheating the oven — the more consistent your strike temperature, the smoother the rest of your brew day will be.
Step 2: Mash the Grains (The Steep)
Place your fine-mesh brewing bag inside the kettle, ensuring the edges are folded over the rim and secured with clips or clamps.
Slowly pour your crushed malt into the bag while stirring gently to avoid clumps (known as dough balls).
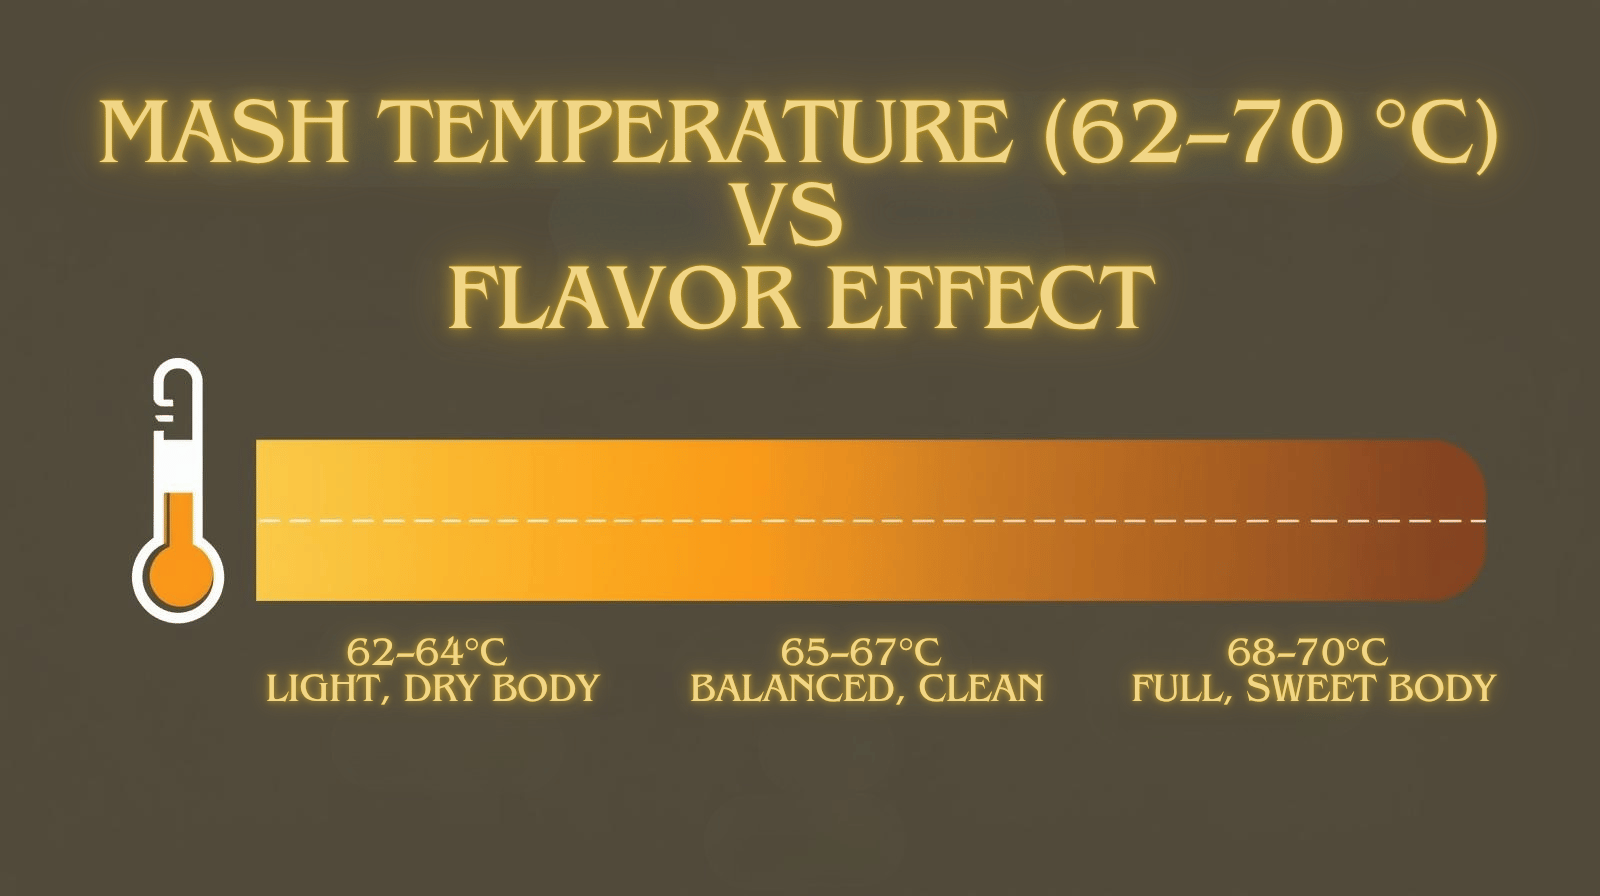
Your goal: maintain a steady mash temperature between 65 °C and 68 °C (149–154 °F) for about 60 minutes.
During this time:
- Enzymes inside the malt convert starches into fermentable sugars.
- Stir every 15 minutes to even out temperature and improve extraction.
- Keep the lid partially on to hold heat.
If your kettle loses too much heat, briefly apply low burner heat while stirring.
This is the core transformation step — where grains become wort, the sweet liquid that will eventually turn into beer.
After an hour, taste a small sample (cool it first): it should taste sweet, not starchy. That means conversion is complete.
Step 3: Lift and Drain the Bag
When mashing is done, carefully lift the grain bag out of the kettle.
Let it drain naturally over the pot for 5–10 minutes — don’t squeeze too hard, as this can release unwanted tannins that create bitterness.
Optional:
- Rinse the bag with 5 L of 75 °C water (called sparging) to wash out extra sugars.
- Add this rinse water back into the kettle to hit your desired pre-boil volume.
Dispose of the spent grain (it makes great compost or bread ingredient!).
Step 4: Boil the Wort and Add Hops
Bring the sweet wort to a rolling boil — typically 60 minutes total.
This step sterilizes the wort, drives off unwanted compounds, and extracts bitterness and aroma from hops.
Add hops according to your recipe’s schedule:
| Boil Time Remaining | Hop Addition Purpose | Typical Example |
|---|---|---|
| 60 min | Bitterness | Magnum, Target |
| 20–15 min | Flavor | Cascade, East Kent Goldings |
| 5–0 min | Aroma | Citra, Saaz |
Keep an eye on the kettle — foam may rise rapidly at the start (the infamous hot break). Stir gently to prevent boil-overs.
If your recipe includes adjuncts like Irish moss (for clarity) or sugar additions, they usually go in during the last 10 minutes.
Step 5: Chill the Wort (Cooling Down)
Once the boil ends, time becomes critical.
Your wort is now sterile but vulnerable to airborne microbes — the faster you cool it, the cleaner your beer.
Options for chilling:
- Immersion chiller: Place the coil in the kettle 10 minutes before the end of the boil to sanitize it, then run cold water through it after flame-out.
- Ice bath: Submerge your kettle in a sink or tub filled with ice water; stir gently to speed cooling.
Aim to cool the wort to below 25 °C (77 °F) before adding yeast.
This protects flavor and prevents off-tastes like cooked corn (DMS).
Step 6: Transfer and Ferment
Now it’s time for yeast to do the real work.
- Sanitize your fermenter, airlock, and siphon thoroughly.
- Pour or siphon the cooled wort into the fermenter, leaving sediment (trub) behind.
- Take a hydrometer reading — this is your original gravity (OG).
- Add (“pitch”) your yeast, seal the lid, and insert the airlock.
Place your fermenter in a dark, temperature-stable spot (ideally 18–22 °C / 64–72 °F for ales).
Within 24 hours you’ll see bubbling — the yeast converting sugars into alcohol and CO₂.
Fermentation usually takes 7–14 days depending on yeast strain and temperature.
Patience pays off — don’t rush it!
Step 7: Bottle and Condition
When the airlock activity slows and hydrometer readings remain stable for two days, fermentation is complete.
- Sanitize your bottles, caps, and bottling bucket.
- Dissolve priming sugar (about 5–6 g per litre) in a small amount of boiled water and add it to the bottling bucket.
- Siphon the beer in gently, avoiding splashing (oxygen = stale beer).
- Fill bottles, leaving 2–3 cm of headspace, then cap tightly.
Store at room temperature for 2–3 weeks to carbonate naturally.
Then chill, pour gently, and enjoy your first homemade beer!
Brewer’s Notes and Small Secrets
- Don’t panic if it’s cloudy: Beer will clear as it conditions.
- Record everything: Temperatures, times, ingredients. A brew log helps you replicate success.
- Sanitize more than you think you need to: Infections are the enemy of flavor.
- Taste each stage: Sweet wort, post-boil, after fermentation — it’s the best way to learn.
The beauty of BIAB lies in how accessible it feels once you’ve done it once.
There’s no need for pumps, fancy systems, or overthinking — just heat, grain, hops, yeast, and your growing skill.
Your first batch will teach you more than a dozen brewing books ever could.
And when that first bottle opens with a hiss and a soft amber pour, you’ll understand why brewers call this hobby “liquid satisfaction.”
🍺 Taste & Travel Like a Beer Pro
Love what you’re reading? Turn inspiration into your next beer adventure:
- 🛒 Beers of Europe – shop iconic craft selections & limited editions
- 🏨 Hotels.com – find cozy stays near top beer festivals
- 🎟️ Viator – join brewery tours & tasting experiences
Plan • Sip • Repeat — your next beer trip starts here.
Choosing Ingredients — Malt, Hops, Yeast & Water
Now that you’ve mastered the steps of the BIAB brewing process, it’s time to explore the four ingredients that bring your beer to life.
Every pint begins here: grain, hops, yeast, and water.
Each plays a vital role — like instruments in a band, they must harmonize.
Understanding them helps you shape the flavor, aroma, and personality of your beer.
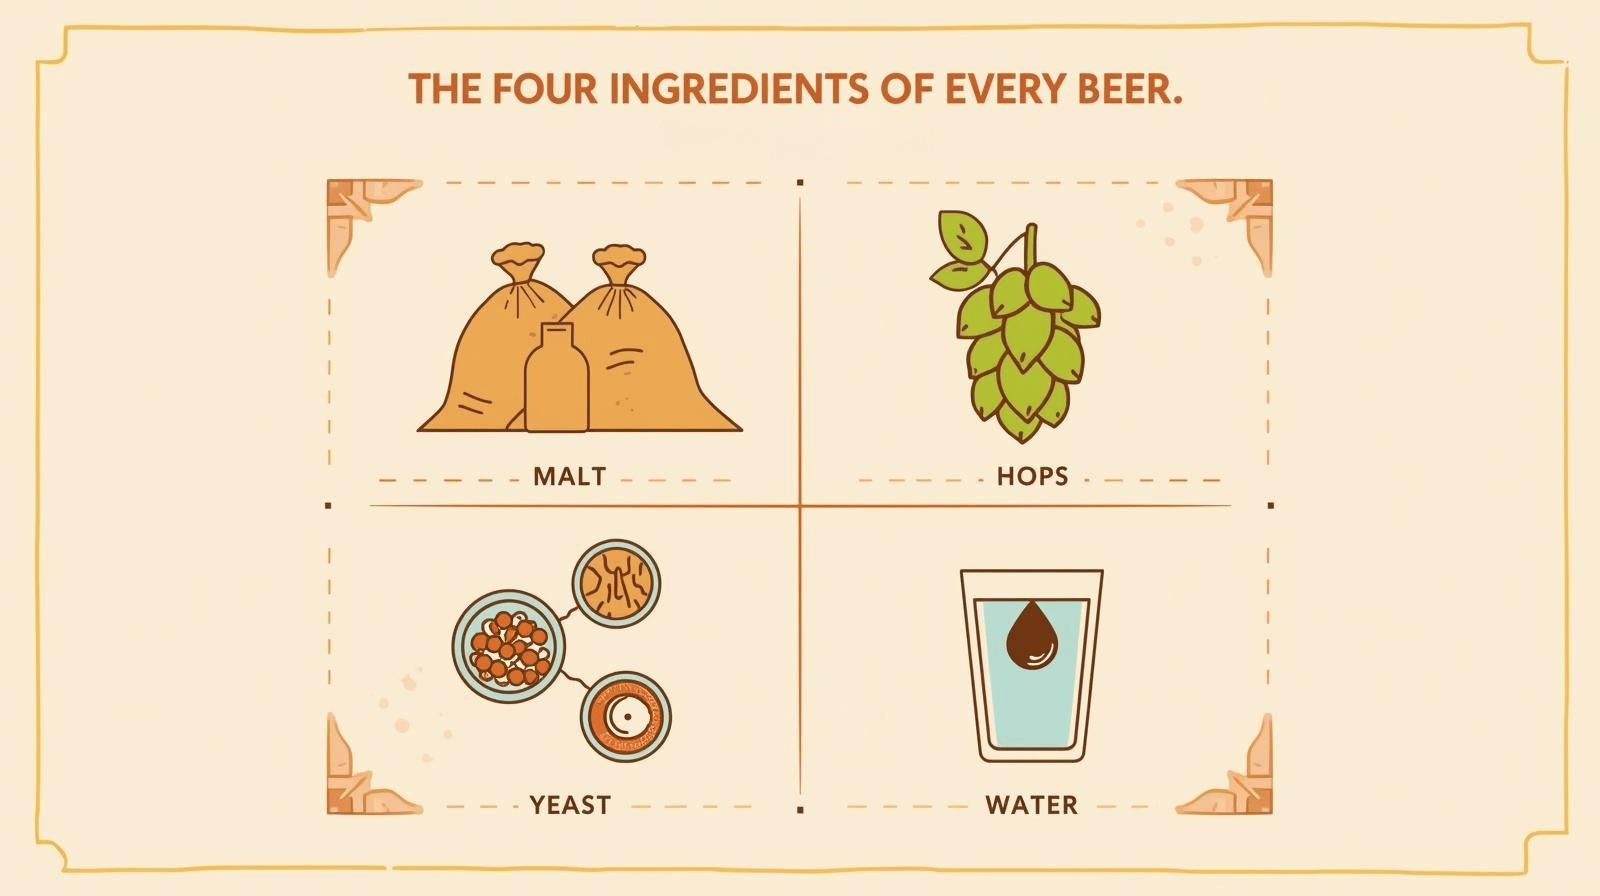
🌾 1. Malt — The Heart of Your Beer
Malt is the soul of your recipe. It provides the color, sweetness, and body that define the beer’s character.
In BIAB brewing, you’ll use crushed malted barley (and sometimes wheat, oats, or rye).
During the mash, enzymes in the malt convert starch into sugar, giving yeast the food it needs to create alcohol.
Base malts:
These make up the majority of your grain bill and provide fermentable sugars.
- Pale Ale Malt – versatile, slightly biscuit flavor.
- Pilsner Malt – light and clean, ideal for lagers or golden ales.
- Maris Otter – classic British malt with nutty, full-bodied depth.
Specialty malts:
Add small percentages (5–15%) to fine-tune color and flavor.
- Caramel/Crystal Malt: Adds sweetness, amber hue, and body.
- Chocolate or Black Malt: Introduces roast, coffee, and darker tones.
- Munich or Vienna Malt: Adds bread and honey-like richness.
🧡 Tip: For your first BIAB batch, aim for a simple grist — around 90% pale malt + 10% crystal malt.
That’s all you need to brew a balanced, flavorful ale.
🌿 2. Hops — Aroma, Bitterness, and Balance
If malt is the melody, hops are the rhythm — they bring freshness and structure to your beer.
Hops contain alpha acids (which provide bitterness) and essential oils (which add aroma and flavor).
In BIAB brewing, hops are typically added during the boil, but you can also dry-hop (add after fermentation) for more aroma.
| Hop Addition | Time in Boil | Effect |
|---|---|---|
| 60 min | Early | Bitterness |
| 20–15 min | Mid | Flavor |
| 5–0 min | Late | Aroma |
| After fermentation | Dry hop | Fresh, floral scent |
Beginner-friendly hop varieties:
- East Kent Goldings (UK) – soft, floral, earthy.
- Cascade (US) – citrus and grapefruit aroma.
- Saaz (Czech) – herbal, mild, perfect for lagers.
- Fuggle (UK) – balanced, traditional English bitterness.
🌸 Tip: Start simple — one or two hop types per recipe. You can always experiment later once you understand what each one contributes.
🍞 3. Yeast — The Invisible Brewer
If malt and hops create the stage, yeast performs the show.
These tiny organisms eat the sugar in wort and produce alcohol, CO₂, and the subtle flavors that define a beer’s personality.
For your first BIAB brew, choose a dry ale yeast — reliable, affordable, and forgiving.
Best yeasts for beginners:
- SafAle US-05: Clean American profile, neutral flavor (perfect for pale ales).
- Nottingham Ale Yeast: Fast, clean, with mild fruitiness.
- S-04 (English Ale): Fuller body, soft malt emphasis.
Fermentation tips:
- Keep the temperature stable (18–22 °C / 64–72 °F).
- Avoid drastic swings — yeast hates stress.
- Give it time. When in doubt, wait another day before bottling.
🧠 Pro Insight: Yeast choice changes the final beer more than many beginners expect.
Try the same recipe twice with two yeasts — you’ll be amazed how one tastes crisp and bright, while the other feels rich and fruity.
💧 4. Water — The Silent Ingredient
Water makes up 90–95% of your beer, but it’s often overlooked.
While you don’t need to dive into chemistry on your first brew, it helps to know the basics.
Good brewing water should be:
- Clean, chlorine-free (use a filter or let tap water sit overnight).
- Moderate in minerals — soft water for pale beers, slightly harder for darker styles.
- pH between 5.2–5.6 during mash (most tap water is fine).
For beginners, start with what you already have. If your tap water tastes good to drink, it’ll make good beer.
Later, you can explore adjustments using brewing salts or bottled spring water for precision — but for now, simplicity wins.
Putting It All Together — A Simple BIAB Recipe Example
Here’s a starting point for your very first batch — a Beginner’s Pale Ale (10 L):
| Ingredient | Amount | Purpose |
|---|---|---|
| Pale Ale Malt | 2.2 kg | Base malt sweetness |
| Crystal 60L | 200 g | Light caramel flavor |
| Cascade hops | 25 g (60 min), 10 g (5 min) | Balanced bitterness + aroma |
| SafAle US-05 yeast | 1 packet | Clean fermentation |
| Water | ~15 L | Mash and boil |
Expected ABV: ~4.8%
Bitterness: ~30 IBU
Color: Deep golden amber
Mash at 66 °C for 60 min, boil 60 min, ferment 10 days at 20 °C.
Chill, bottle, and enjoy your own handcrafted ale — fresh, aromatic, and completely yours.
Understanding your ingredients turns brewing from a recipe into a creative craft.
Once you know how each element shapes your beer, you’ll start thinking like a brewer — not just following steps, but composing flavors.
And that’s where the true joy of homebrewing begins.
Common Mistakes & How to Avoid Them
Every brewer — even the pros — makes mistakes. The key is to make them once, learn from them, and keep improving.
The BIAB method simplifies the brewing process, but there are still a few easy traps to fall into on your first few brew days.
Here’s how to recognize them — and how to avoid them.
1. Missing Your Mash Temperature
Your mash temperature controls how sweet or dry your beer turns out.
If it’s too low, enzymes work too quickly and create a thin, dry beer. Too high, and your beer may finish heavy or overly sweet.
✅ Avoid it by:
- Heating your strike water a few degrees higher (around 72 °C / 162 °F) to compensate for the grain’s cooling effect.
- Checking your thermometer’s accuracy before brew day.
- Stirring thoroughly after adding grains to even out temperature.
2. Squeezing the Grain Bag Too Hard
It’s tempting to squeeze out every last drop when lifting your bag — but resist the urge.
Excessive pressure can extract tannins from the husks, leaving an unpleasant dry, bitter aftertaste.
✅ Avoid it by:
- Letting the bag drain naturally for 5–10 minutes.
- Giving it a gentle squeeze at most, or setting it on a colander over the kettle to drip.
3. Skipping Sanitation
The single biggest cause of ruined homebrew is poor sanitation.
Once your wort cools after the boil, it’s a buffet for bacteria and wild yeast. Even one dirty spoon or unsanitized siphon can spoil an entire batch.
✅ Avoid it by:
- Sanitizing every tool that touches cooled wort — fermenter, funnel, airlock, hydrometer, siphon.
- Using a no-rinse sanitizer like Star San or Chemipro San.
- Mixing fresh sanitizer each brew day; don’t reuse cloudy solution.
4. Boil-Overs and Overflow
When the wort first reaches a boil, proteins and foam surge upward — it’s called the hot break.
A distracted brewer can lose half a batch to sticky foam in seconds.
✅ Avoid it by:
- Watching the kettle closely as it starts to boil.
- Stirring gently to collapse foam.
- Lowering the heat slightly once the rolling boil is established.
- Keeping a spray bottle of cold water nearby to knock back foam instantly.
5. Over- or Under-Carbonating Bottles
Priming sugar determines how bubbly your beer becomes. Too little and it’s flat; too much and bottles can over-pressurize — or even explode.
✅ Avoid it by:
- Measuring priming sugar accurately (5–6 g per litre).
- Dissolving sugar in boiled water, then stirring evenly into the bottling bucket.
- Storing bottles at room temperature for 2–3 weeks, then chilling before opening.
6. Bottling Too Early
Patience is a brewer’s best friend. If you bottle while fermentation is still active, CO₂ keeps forming — creating gushers or exploding bottles.
✅ Avoid it by:
- Checking gravity readings with your hydrometer over two days. If they’re stable, fermentation is done.
- Giving your beer a couple of “insurance days” before bottling, especially for higher-gravity brews.
7. Ignoring Record-Keeping
Great beer comes from understanding what worked — and what didn’t.
Many new brewers forget to write down details, making it impossible to replicate a good batch later.
✅ Avoid it by:
- Keeping a brew journal with:
- Recipe details
- Mash temps & times
- Gravity readings
- Tasting notes
- Using free brewing software like Brewers Friend, Brewfather, or BeerSmith to log batches.
8. Expecting Perfection on Batch One
The first beer you brew might not win awards — and that’s perfectly fine.
Every brewer has poured a few “learning beers” down the drain. Each batch teaches you something: patience, process, and appreciation.
✅ Avoid frustration by:
- Keeping expectations realistic — aim for drinkable, not flawless.
- Celebrating small wins (a clear pour, steady fermentation, balanced flavor).
- Remembering that consistency comes with repetition.
Final Thought
The beauty of BIAB homebrewing is that mistakes rarely ruin the journey — they just make the next pint better.
Every time you lift the grain bag, watch the boil, or taste a freshly carbonated bottle, you’re learning.
So relax, sanitize, and enjoy the process — that’s not just a homebrewing mantra; it’s the foundation of great beer.
Tips for Perfecting Your First Brew
Your first brew day is over, the bottles are conditioning on the shelf, and you’re already thinking: How can I make the next one even better?
That curiosity is what turns a beginner into a brewer.
The truth is, most great beers come from small adjustments, not big overhauls.
Here are the habits, techniques, and insider tricks that will help you refine your process and elevate every batch.
1. Keep a Brew Journal
Write down everything.
Temperature readings, hop additions, yeast strain, tasting notes — even what went wrong.
A brewing notebook becomes your most valuable tool; it shows patterns and helps you identify exactly what caused that perfect (or not-so-perfect) flavor.
Try recording:
- Date and batch number
- Mash temperature and duration
- Original and final gravity
- Fermentation temperature
- Tasting impressions after carbonation
Once you’ve logged a few brews, you’ll see your progress — and that’s incredibly motivating.
2. Control Your Fermentation Temperature
Brewing is chemistry, but fermentation is biology — and yeast are picky roommates.
Even the cleanest recipe can taste off if your fermentation temperature fluctuates wildly.
- Keep ales between 18–22 °C (64–72 °F) unless your yeast specifies otherwise.
- Avoid hot spots (near ovens or radiators).
- If you’re brewing in summer, wrap your fermenter with a damp towel or set it in a cool water bath.
- In winter, a cheap heating belt or insulated box helps maintain consistency.
Consistent fermentation is often the difference between “homemade” and “craft-quality.”
3. Master Your Water-to-Grain Ratio
In BIAB, water is part of your equipment.
Too little, and you’ll scorch the grains; too much, and your wort will be thin.
Start with 2.7–3 L of water per kilogram of grain, then adjust in future brews to fine-tune body and efficiency.
Record the numbers in your brew journal and you’ll quickly find your system’s “sweet spot.”
4. Use Fresh Ingredients
Old hops lose their aroma. Stale malt dulls flavor.
Buy your grains freshly crushed, keep hops sealed in the freezer, and replace yeast that’s past its date.
Fresh ingredients give you cleaner, brighter beer — the simplest upgrade there is.
5. Taste at Every Stage
Brewing is a sensory journey.
Taste your wort after the mash, after the boil, after fermentation — even flat and uncarbonated.
You’ll learn what sweetness tastes like before fermentation and how hops transform during the boil.
This trains your palate and helps you spot problems early (like sourness from infection or harsh bitterness from over-boiling).
6. Start Simple — Then Experiment
Your first few brews should be straightforward styles: pale ale, blonde, or simple stout.
Once you’re confident, play.
Try a dry-hop addition, swap yeasts, or add a small amount of specialty malt for color and complexity.
Change one variable at a time so you can taste the difference — that’s how professional brewers refine recipes.
7. Embrace Patience
The hardest lesson for new brewers: beer improves with time.
Even when carbonation is done, another week or two of conditioning in a cool, dark place will round out flavors and smooth bitterness.
Don’t rush to crack every bottle — stash a few and taste the difference over a month.
You’ll be amazed how a little patience can transform your beer.
8. Join a Brewing Community
Brewing is more fun (and far more educational) when you’re not alone.
Join a local homebrewing club, follow Reddit’s r/Homebrewing, or participate in online recipe swaps.
Sharing results, troubleshooting together, and tasting other brewers’ creations accelerates your learning curve — and keeps the passion alive.
Final Tip: Focus on Consistency
Anyone can make good beer once; great brewers make it twice.
The goal isn’t constant novelty — it’s repeatability.
Once you can brew the same recipe with identical results, you’ll know you’ve mastered your system.
The BIAB homebrewing method gives you that control: one kettle, one process, one chance to improve every time.
Before long, you’ll stop thinking of yourself as a beginner and start thinking like a brewer.
Cleaning, Sanitizing & Bottling
There’s an old saying among brewers:
“You’re not just making beer — you’re cleaning equipment and preventing infection.”
It might not sound glamorous, but cleanliness is what separates a crisp, drinkable beer from a funky disaster.
Even the best recipe in the world can’t survive contamination.
Let’s break down this critical final stage of your BIAB brewing journey — how to clean, sanitize, and package your beer safely for perfect carbonation.
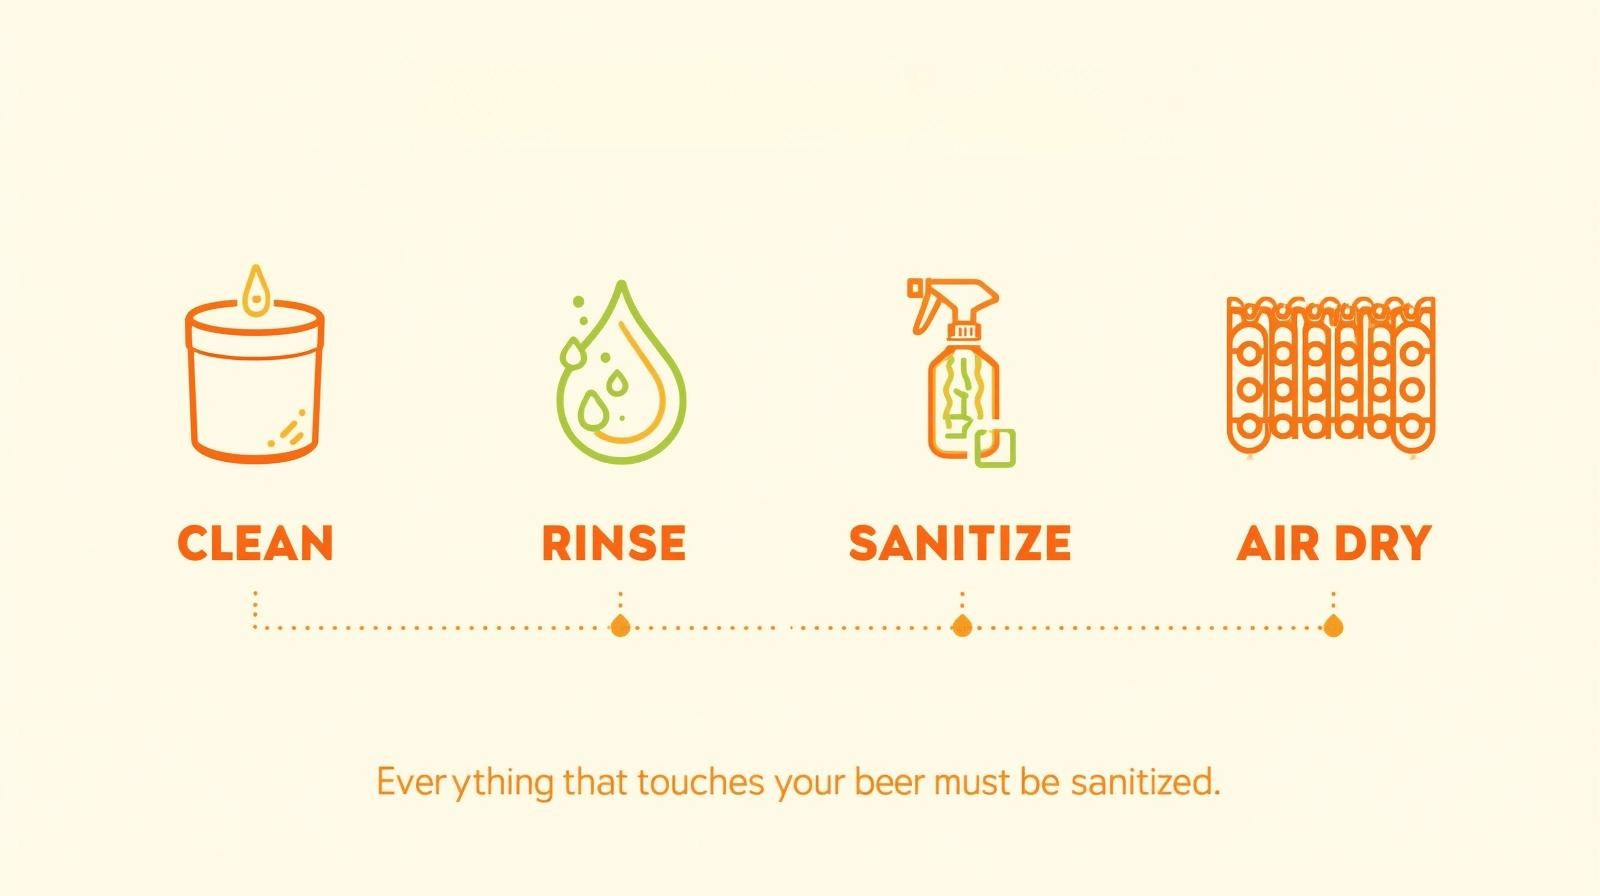
1. Cleaning vs. Sanitizing — Know the Difference
Cleaning removes visible dirt and residue.
Sanitizing kills invisible microbes (wild yeast and bacteria) that could spoil your beer.
You need both steps — in that order.
- Clean first using warm water and a mild, unscented cleaner.
(Avoid dish soaps that leave residue; use PBW or OxiClean Free instead.) - Rinse thoroughly.
- Then sanitize using a no-rinse sanitizer such as Star San or Chemipro San.
These kill bacteria in seconds and don’t require rinsing.
🧼 Pro Tip: Don’t use bleach on brewing gear — it can cause off-flavors and damage stainless steel.
2. Cleaning Your Equipment After the Brew
As soon as you’ve finished your brew day and transferred the wort to the fermenter:
- Rinse your kettle, spoon, and bag immediately — dried grain is stubborn.
- Soak your mesh bag in warm water and mild cleaner, then hang it to dry.
- Wipe down your kettle and thermometer; a quick cleanup now saves hours later.
- Keep a spray bottle of sanitizer nearby during brew day to quickly sanitize tools if needed.
Clean gear also makes your next brew faster and smoother — and your future self will thank you.
3. Sanitizing Before Bottling
Before bottling day, wash and inspect every bottle for cracks or dirt. Then:
- Soak bottles in warm PBW solution for 30 minutes to loosen residue.
- Rinse thoroughly and drain upside down on a clean rack.
- Sanitize with Star San or Chemipro solution — either fill each bottle or use a bottle-sanitizing rinser for speed.
- Sanitize your siphon, bottling bucket, caps, and tubing too.
Remember: everything that touches the beer after fermentation must be sanitized.
This includes spoons, funnels, thermometers, and your hands if you’re adjusting lids or airlocks.
4. Priming for Carbonation
To give your beer natural fizz, you’ll add a small dose of sugar before bottling — called priming sugar.
The remaining yeast eats this sugar inside the sealed bottle, producing CO₂ that dissolves into the beer.
- Dissolve 5–6 grams of sugar per litre of beer in a small pot with 200 ml of boiled water.
- Cool and pour it evenly into your sanitized bottling bucket.
- Then siphon your beer on top to mix gently (avoid splashing — oxygen spoils beer).
Too little sugar = flat beer.
Too much = over-carbonation or bursting bottles. Measure carefully and stir gently.
5. Bottling Your Beer
- Attach your bottling wand or siphon to the spigot of your sanitized bottling bucket.
- Fill each bottle until the beer almost reaches the top — when you remove the wand, the space left is perfect headspace (~2–3 cm).
- Cap each bottle firmly using a capper and sanitized caps.
- Wipe any drips and store the bottles upright at room temperature (18–22 °C) for 2–3 weeks.
This conditioning period allows carbonation to develop naturally.
After that, chill one bottle overnight, open it, and listen for that soft “psssht” — your first BIAB success.
6. Label, Store & Enjoy
Once carbonated, store your beer in a cool, dark place (ideally 10–15 °C).
Sunlight and heat degrade flavor and aroma quickly.
You can even get creative:
- Print or handwrite labels with the beer name, style, date, and ABV.
- Keep one bottle from each batch to track how flavors evolve over time.
7. Cleaning After Bottling
When bottling is done, rinse everything immediately — especially the bottling bucket and siphon tubing.
Dry completely before storing to prevent mold or residue buildup.
Think of it as “closing the loop” on your brew day — ending clean means starting clean next time.
A Brewer’s Mindset
Every professional brewer will tell you the same secret:
90% of brewing is cleaning, and the rest is storytelling.
When you master sanitation, you eliminate the biggest source of error in homebrewing.
The BIAB process gives you total control over flavor, but cleanliness keeps that flavor pure.
So, keep your tools spotless, your bottles shining, and your beer will always thank you — one perfect pour at a time.
Scaling Up — From Small Batch to Advanced BIAB
Once you’ve successfully brewed a few batches using the BIAB method, you might start thinking bigger — literally.
Maybe you want to brew 25 liters instead of 10, refine your efficiency, or start experimenting with more complex recipes.
The good news? Scaling up BIAB is simple. You’re already using a process that was designed to grow with you.
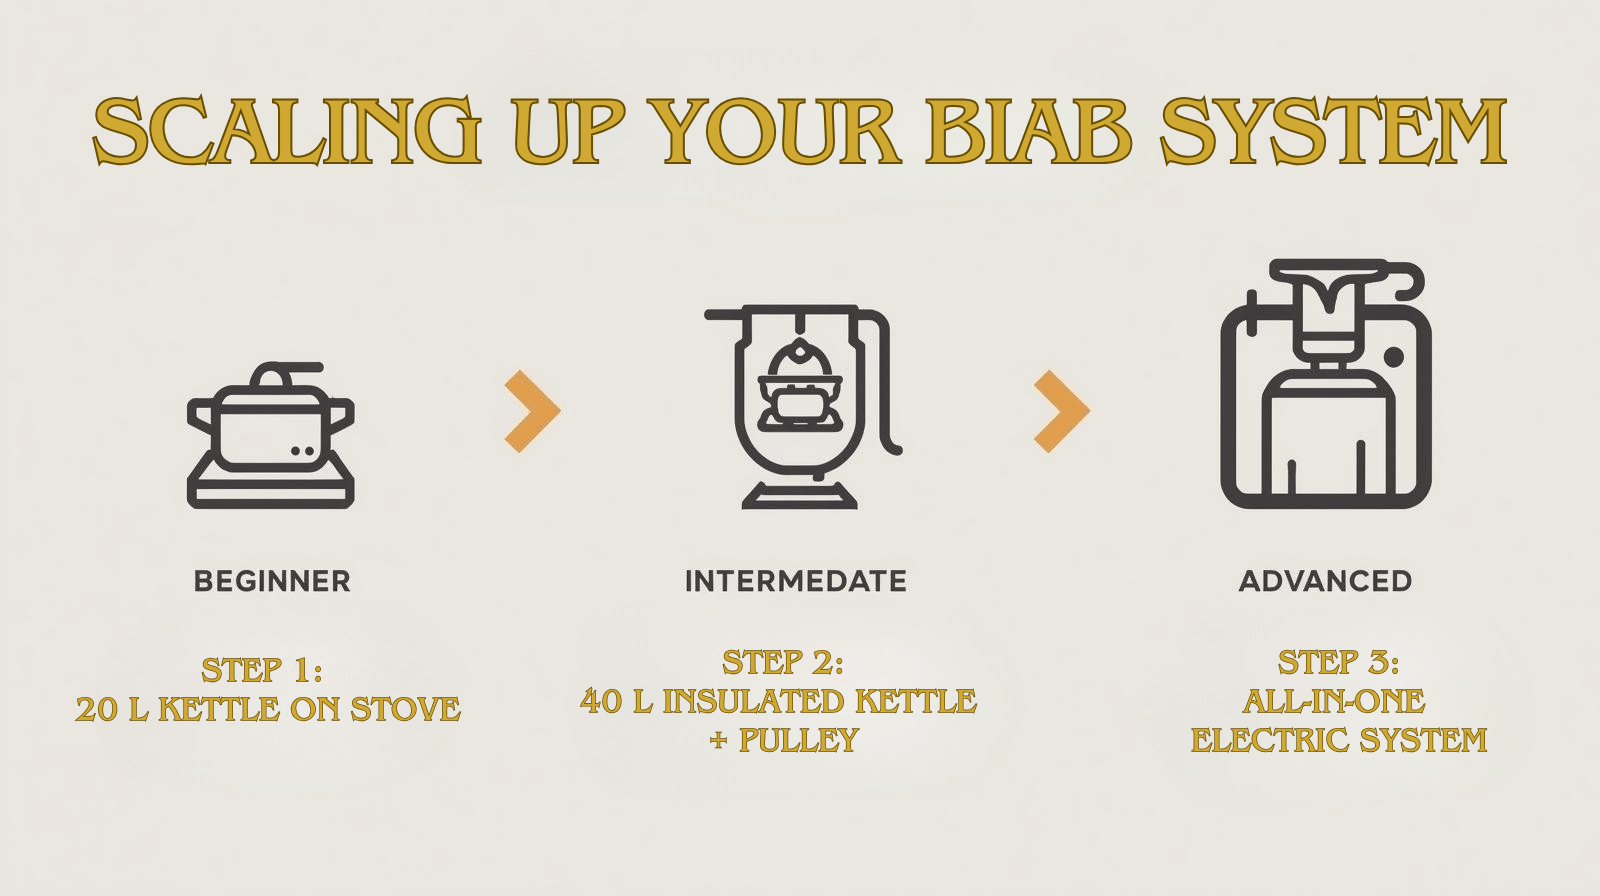
Here’s how to evolve from beginner-friendly batches to a more advanced, consistent brewing system — without losing the heart of what makes BIAB great: simplicity, creativity, and control.
1. Upgrade Your Equipment, Not Your Complexity
BIAB scales beautifully with just a few upgrades.
You don’t need to abandon your method or invest in a multi-vessel system — simply enhance what’s working.
Smart upgrades to consider:
- Bigger kettle: A 40–50 L stainless-steel kettle allows you to brew 25–30 L finished batches.
- Electric heating element: Helps maintain mash temperature without using a gas stove.
- Pulley or hoist system: Makes lifting a heavy grain bag safe and effortless.
- Insulation jacket or thermal wrap: Keeps your mash temp steady, especially in cooler environments.
- Wort chiller: An immersion or counterflow chiller saves time and improves clarity by cooling faster.
🧠 Pro Tip: If you brew indoors, consider an all-in-one BIAB system like the BrewZilla or Grainfather. These units automate heating, mashing, and pumping in one device while keeping the BIAB principle intact.
2. Adjust Water Volumes and Efficiency
As you scale up, your mash thickness, evaporation rate, and grain absorption slightly change.
Large volumes hold heat better but take longer to heat and cool — which can affect efficiency.
Quick calibration steps:
- Track how much liquid you lose during the boil and after grain removal.
- Record pre-boil and post-boil volumes for a few batches.
- Use that data to fine-tune future recipes — it’s how professional brewers ensure repeatability.
For most setups, efficiency (how much sugar you extract from the grain) will range between 70–80%.
As your technique improves, expect that number to rise.
3. Explore Temperature Stability & Recirculation
BIAB’s simplicity doesn’t mean you can’t get technical.
Advanced brewers often use recirculation systems — small pumps that continuously move wort through the grain bag, keeping temperature and sugar extraction even.
If you prefer a manual setup, try this low-tech trick:
- Wrap your kettle in a thick blanket or camping mat during the mash.
- Stir gently every 10–15 minutes.
- Recheck temperature halfway through and reheat if needed.
Even without pumps, you can achieve excellent mash consistency with attention and patience.
4. Fine-Tune Your Ingredients
Once you’re confident with your base process, start experimenting with ingredient precision.
Try these advanced adjustments:
- Water chemistry: Use a simple brewing salt calculator to match your water profile to the beer style (e.g., more sulfates for crisp IPAs, more chlorides for malty beers).
- Hop timing and aroma layering: Split your hop additions into multiple smaller doses throughout the boil or add dry hops post-fermentation.
- Yeast management: Reuse healthy yeast slurry or experiment with liquid yeast strains for more complex flavor profiles.
Remember, complexity should serve flavor, not ego. Keep your process as clean and repeatable as it was on day one.
5. Consider Fermentation Control
Once you scale up, fermentation becomes your biggest quality factor.
Larger batches mean more thermal mass — your beer will retain heat longer, which can stress yeast if not monitored.
Investing in temperature control gives you the single biggest leap in beer quality:
- Use a dedicated fridge with an inkbird temperature controller.
- For lagers, set fermentation around 10–12 °C for 2–3 weeks.
- For ales, hold 18–20 °C steadily for a clean finish.
Even on a small scale, consistent fermentation temperature equals professional consistency in every glass.
6. Scaling Recipes with Software
Once you start brewing larger or more frequent batches, software tools make life easier.
Programs like Brewfather, BeerSmith, or Brewers Friend automatically scale recipes, calculate strike water, and predict your final ABV and IBU.
These tools help you answer questions like:
- “If I double my grain bill, how much water do I need?”
- “What’s my estimated efficiency loss?”
- “Will my hop bitterness stay the same in a larger boil volume?”
By logging each brew digitally, you build your own brewing database — a personal BeerMadness lab.
7. Dream Beyond the Kettle
Many of the best microbreweries started with BIAB.
It teaches brewers to think resourcefully, to understand the relationship between process and flavor, and to brew without hiding behind equipment.
Once you’ve nailed BIAB on a small scale, you can easily transition to:
- Pilot systems for recipe development
- Partial mash experiments for unique flavors
- Or even professional nano-brewing setups
The skills you learn here — temperature control, sanitation, recipe formulation — are the same foundations professionals rely on every day.
Final Thought
Scaling up isn’t about brewing more beer — it’s about brewing better beer.
Your process becomes sharper, your ingredients more deliberate, your results more consistent.
BIAB gives you a foundation that grows with you. Whether you stay small-batch for the love of experimentation or expand into full-scale brewing, you’re part of a centuries-old craft — one perfected a kettle at a time.
FAQ — BIAB Homebrewing Guide (Featured Snippet Optimized)
What does BIAB mean in homebrewing?
BIAB stands for Brew In A Bag, a simplified all-grain brewing method where you mash, boil, and cool your beer in one kettle using a mesh bag to hold the grains. It eliminates the need for multiple vessels and complex transfers, making all-grain brewing accessible to beginners.
Is BIAB good for beginners?
Absolutely. The BIAB process is ideal for beginners because it reduces cost, equipment, and steps — without sacrificing quality. You learn all-grain fundamentals in a more approachable, compact format, making it perfect for small kitchens or limited space.
What equipment do I need for BIAB homebrewing?
You only need a few essentials:
A large kettle (20–30 L)
A fine mesh grain bag
A digital thermometer
A fermenter with airlock
A hydrometer
Sanitizer
Optional upgrades include a wort chiller, pulley system, or electric heating element for temperature control.
How long does a BIAB brew day take?
Most BIAB brew days take 4–5 hours from heating the water to cleanup. The mash lasts around 60 minutes, followed by a 60-minute boil and cooling time. Because everything happens in one pot, BIAB cuts hours off traditional all-grain brewing.
Can I brew lagers using BIAB?
Yes — but lagers require temperature-controlled fermentation. The BIAB method handles the mash and boil perfectly, but you’ll need a fridge or fermentation chamber to maintain cool temperatures (around 10–12 °C) for proper lager yeast performance.
How much beer can I make with BIAB?
Most home brewers produce 10–25 liters per batch, depending on kettle size. A 30-liter kettle typically yields around 20 liters (5 gallons) of finished beer after evaporation and fermentation loss.
What’s the easiest beer style to start with?
Start with forgiving, easy-drinking styles like Pale Ale, Blonde Ale, or Wheat Beer. These use moderate hop levels and simple grain bills, making them ideal for your first few BIAB brews.
Do I need to sparge when brewing BIAB?
Sparging (rinsing the grain) is optional in BIAB. Many brewers skip it entirely and still achieve great efficiency. If you’d like to maximize sugar extraction, pour 5–6 L of 75 °C water through the grain bag after mashing — but don’t overcomplicate it on your first batch.
Can I reuse the grain bag?
Yes — a quality nylon or polyester brewing bag can last for dozens of batches. After each brew, rinse it thoroughly, soak in a mild cleaner like PBW, and let it air-dry completely before storing.
How do I calculate my beer’s alcohol content (ABV)?
Use a hydrometer to measure your original gravity (OG) before fermentation and final gravity (FG) after it finishes.
Then apply the formula:
ABV = (OG – FG) × 131.25
For example, if your beer starts at 1.050 and finishes at 1.010, your ABV is around 5.25%.
How long does homebrewed beer last?
When properly bottled and stored in a cool, dark place, homebrewed beer stays fresh for 3–6 months. Lighter beers fade faster, while stronger or darker styles often improve with age.
🍻 More from BeerMadness
- 👉 Best Irish Red Ales in the UK (2025 Edition)
- 🔥 Best Gluten-Free and Vegan-Friendly Craft Beers in 2025
- 🌍 Best Craft Breweries, Beer Bars, and Pub Crawls Barcelona (2025 Guide)
Keep exploring the world of craft beer — one pour at a time.
So here you are — your ingredients lined up, your kettle waiting, your curiosity sparked.
The BIAB homebrewing method proves that great beer doesn’t require a fancy brewery or a massive budget — just heat, grain, water, yeast, and the willingness to learn.
You’ve now walked through every step — from understanding what BIAB is, to selecting ingredients, to mastering the process, avoiding mistakes, and even scaling up.
You’ve got the knowledge, the roadmap, and, most importantly, the inspiration.
The only thing left to add is your own story — your first brew day.
The beauty of homebrewing lies in its simplicity and patience.
It’s not just about making beer; it’s about creating something from your own hands, learning through each sip, and feeling the quiet pride that comes with that first perfect pour.
Every brewer remembers their first batch — the aroma of malted grain, the hiss of the first bottle opening, the taste of something you made.

And that’s what BeerMadness is all about: turning passion into craft, one pint at a time.
So go ahead — grab your kettle, heat the water, and brew your story. 🍺
Then come back, explore more guides, share your results, and keep learning with us at BeerMadness.com — where every good beer begins with curiosity.